How to Unclog a Clogged Catalytic Converter: A Step-by-Step Guide

The catalytic converter is a critical component of your vehicle's exhaust system, designed to reduce harmful emissions and ensure your car runs efficiently. Over time, it can become clogged due to carbon deposits, unburned fuel, or engine malfunctions. A clogged catalytic converter can lead to poor engine performance, reduced fuel efficiency, and even damage to other components. Here's a step-by-step guide to help you unclog your catalytic converter safely and effectively.
Symptoms of a Clogged Catalytic Converter
Before addressing the issue, it’s essential to confirm the symptoms of a clogged catalytic converter. Common signs include:
- Reduced Engine Performance: Loss of power, especially during acceleration.
- Poor Fuel Efficiency: Increased fuel consumption without apparent reason.
- Check Engine Light: Triggered due to inefficiencies in the exhaust system.
- Sulfur Smell: A rotten egg odor from the exhaust.
- Excessive Heat: The catalytic converter feels extremely hot.
Tools and Materials You’ll Need
- Protective gloves and safety glasses
- Wrench or socket set
- Spray-on catalytic converter cleaner (or equivalent product)
- Fuel additive cleaner
- Compressed air (optional)
- A replacement gasket (if necessary)
Step 1: Inspect the Catalytic Converter
- Locate the Catalytic Converter: It's typically situated between the engine and the muffler along the exhaust system.
- Visual Inspection: Look for signs of damage, rust, or excessive soot.
- Temperature Test: Use an infrared thermometer to compare the inlet and outlet temperatures. A significant drop may indicate a blockage.
Step 2: Use a Fuel Additive Cleaner
A simple and less invasive way to clean a mildly clogged catalytic converter is by using a fuel system cleaner.
- Purchase a catalytic converter-specific cleaner from your local auto parts store.
- Add the cleaner to a nearly empty fuel tank according to the product’s instructions.
- Fill the tank with fuel and drive the car at highway speeds for 30–60 minutes to allow the cleaner to work through the system.
Step 3: Remove and Clean the Catalytic Converter
If the fuel additive doesn't resolve the issue, a deeper cleaning may be required.
Remove the Catalytic Converter
- Lift the Vehicle: Safely elevate the car using a jack and secure it with jack stands.
- Disconnect: Remove the bolts securing the catalytic converter to the exhaust system. Use penetrating oil to loosen stubborn bolts.
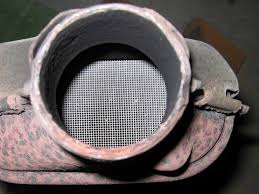
- Inspect for Damage: Check the internal honeycomb structure for severe damage or melting. If it’s damaged, replacement is necessary.
Clean the Catalytic Converter
- Soak in Cleaner: Submerge the catalytic converter in a solution of hot water and dish soap or a specialized cleaner for several hours.
- Rinse Thoroughly: Use water to flush out carbon deposits.
- Dry Completely: Allow the converter to air dry or use compressed air to speed up the process.
Step 4: Reinstall the Catalytic Converter
- Replace Gaskets: If the gasket is worn, replace it with a new one to ensure a proper seal.
- Reconnect the Converter: Bolt it back into place securely.
- Test the Vehicle: Start the engine and observe if performance and fuel efficiency improve.
Step 5: Prevent Future Clogs
- Regular Maintenance: Change spark plugs and oil regularly to avoid unburned fuel reaching the converter.
- Use Quality Fuel: High-quality fuel reduces carbon buildup.
- Fix Engine Issues Promptly: Address misfires or other engine problems quickly.
When to Seek Professional Help
If cleaning doesn’t restore performance or if the catalytic converter shows signs of structural damage, it’s best to replace it. Consulting a mechanic is advisable to confirm the issue and ensure a proper fix.
By following these steps, you can save costs and extend the lifespan of your catalytic converter while keeping your vehicle eco-friendly and efficient.

 Loading..