When to Replace Your Radiator Cap

Discover the critical signs that indicate it's time to replace your car's radiator cap and why timely replacement can save you from costly repairs.
Understanding the Role of a Radiator Cap
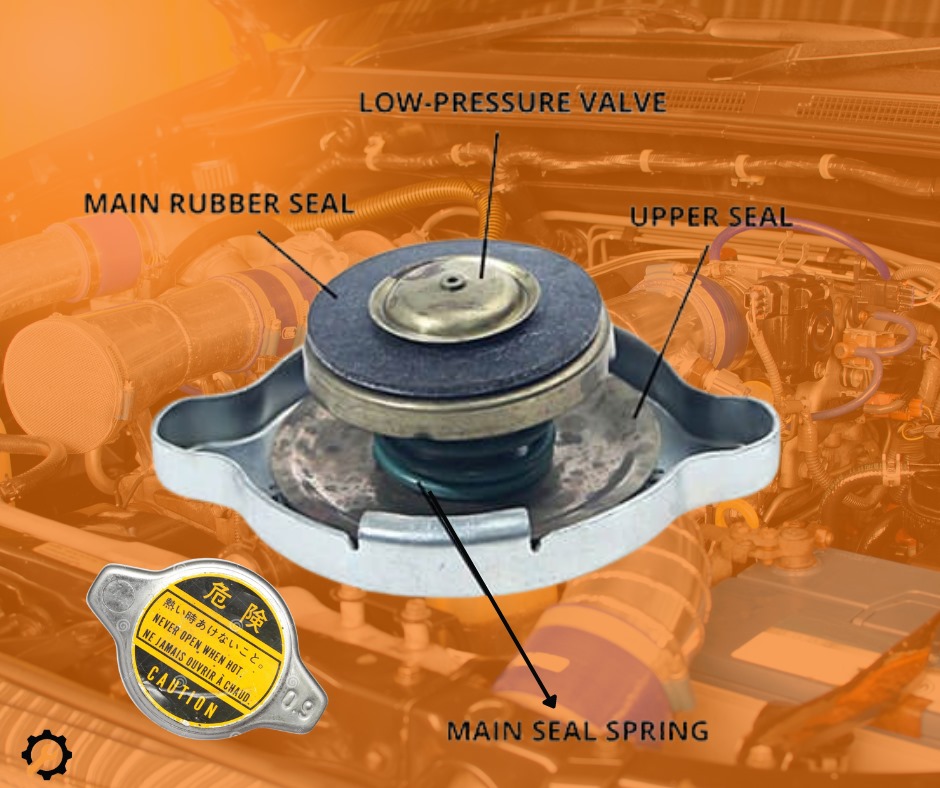
The radiator cap is a small but vital component of your car's cooling system. It serves as a pressure relief valve, allowing coolant to flow between the radiator and the overflow reservoir. A properly functioning radiator cap helps maintain the optimal pressure within the system, preventing overheating and coolant loss.
Additionally, the radiator cap also acts as a seal, keeping the coolant from evaporating and maintaining the correct fluid level. It plays a crucial role in maintaining the overall efficiency and performance of your vehicle's cooling system.
Common Signs of Radiator Cap Failure
Recognizing the signs of a malfunctioning radiator cap is important to prevent potential damage to your car's engine. Some common signs of radiator cap failure include:
- Coolant leaks: If you notice coolant puddles under your car or a decrease in coolant level without any visible leaks, it could be a sign of a faulty radiator cap.
- Overheating: A malfunctioning radiator cap can cause the coolant to boil and the engine to overheat. If you frequently experience overheating issues, it's worth checking the condition of your radiator cap.
- Coolant odor: A strong, sweet smell of coolant inside or around your vehicle could indicate a failing radiator cap.
- Steam or hissing sounds: If you see steam coming from under the hood or hear hissing sounds when the engine is running, it may be due to a faulty radiator cap.
If you notice any of these signs, it is recommended to replace your radiator cap as soon as possible to avoid further damage to your cooling system.
How a Faulty Radiator Cap Affects Your Vehicle
A faulty radiator cap can have various negative effects on your vehicle:
- Reduced cooling system efficiency: A malfunctioning radiator cap can lead to coolant loss, causing the engine to overheat. This can result in reduced cooling system efficiency and potential engine damage.
- Increased risk of radiator damage: When the radiator cap fails to maintain the proper pressure, it can put excessive strain on the radiator, leading to leaks or even radiator failure.
- Higher repair costs: Ignoring a faulty radiator cap can result in more severe damage to the cooling system, leading to costly repairs or even engine replacement.
It is essential to address any issues with your radiator cap promptly to prevent further damage and maintain the optimal performance of your vehicle.
Steps to Replace Your Radiator Cap
Replacing a radiator cap is a relatively simple process that can be done with a few easy steps:
1. Make sure the engine is cool: It is important to wait until the engine has cooled down completely before attempting to replace the radiator cap.
2. Locate the radiator cap: The radiator cap is typically located on the top of the radiator or the coolant overflow reservoir. Refer to your vehicle's manual if you are unsure.
3. Release pressure from the cooling system: To avoid any potential injuries, carefully relieve pressure from the cooling system by slowly turning the radiator cap counterclockwise until you hear a hissing sound.
4. Remove the old radiator cap: Once the pressure is released, continue turning the cap counterclockwise until it can be lifted off the radiator or reservoir.
5. Install the new radiator cap: Place the new radiator cap onto the radiator or reservoir and turn it clockwise until it is securely tightened.
6. Check for leaks: After replacing the radiator cap, inspect the surrounding area for any signs of coolant leaks. If you notice any leaks, it may indicate a separate issue that needs to be addressed.
By following these steps, you can easily replace your radiator cap and ensure the proper functioning of your vehicle's cooling system.
Maintaining Your Radiator Cap for Optimal Performance
To maintain the optimal performance of your radiator cap, consider the following tips:
- Regular inspection: Periodically check the condition of your radiator cap for any signs of wear or damage. If you notice any issues, it is recommended to replace the cap.
- Proper tightening: Ensure that the radiator cap is securely tightened to prevent coolant leaks.
- Coolant level checks: Monitor the coolant level in your vehicle regularly and top it up if necessary. Maintaining the correct fluid level helps prevent pressure fluctuations in the cooling system.
- Scheduled maintenance: Follow your vehicle manufacturer's recommended maintenance schedule, which may include radiator cap inspections or replacements.
By properly maintaining your radiator cap, you can prolong its lifespan and prevent potential cooling system problems.
Drop us a message from our facebook page or Chat us using the widget on the right to order a radiator cap for your car.

 Loading..